How to Use FlasherLoader
This tutorial explains the purpose of the FlasherLoader utility and how to use it within the OSCAR ecosystem.
Why FlasherLoader Exists
OSCAR executable programs require resource files such as fonts, images, samples, and other assets. Without these resources, the effects cannot operate correctly.
Before running any effect, all required resources must therefore be loaded into the external QSPI flash memory of the OSCAR platform.
The FlasherLoader
FlasherLoader has two main functions:
-
Flasher
In collaboration withOSCAR_Flasher_Server, the FlasherLoader receives files through the USB connection and stores them into the OSCAR platform’s QSPI flash memory. -
Loader
When the OSCAR platform powers on, the FlasherLoader loads an executable ELF file into RAM and starts its execution.
The Flasher Server
OSCAR_Flasher_Server is a utility program that runs on your computer. It allows you to transfer files through a COM port over the USB connection linked to the OSCAR pedal.

Note:
The Flasher Server currently only works on Windows. Contributions are welcome to help port the utility to Linux or macOS. A Python implementation could also be a good alternative.
Preparation of Files by the Server Processor
The Flasher Server preprocesses some file types to simplify their use inside OSCAR effects:
Image Files Supported formats include:
- JPG
- PNG
- GIF
- and more…
Image files are automatically converted to RAW format, making them directly compatible with the DAD_FORGE / STM_GFX graphics library.
ELF Effect Files (Executables) ELF executables undergo processing: they are parsed, processed, and reformatted for easy use by the OSCAR Loader.
Other Files All other file types are transferred without modification.
Prerequisites
You must have:
- A working OSCAR pedal with a compatible 12V power supply
FlasherLoaderalready programmed into the STM32 internal flash memory
See tutorials:
Using FlasherLoader
Start the Flasher Server
On your computer, launch:
...\OSCAR_Workspace\OSCAR_P01_FlasherLoader\@FlasherServer\OSCAR_Flasher_Server.exe
Connect the OSCAR pedal to your computer using a USB cable. Power on the pedal while holding Footswitch 1 pressed. This disables automatic booting and displays the FlasherLoader interface.
OSCAR FlasherLoader Interface
The interface contains two sections: 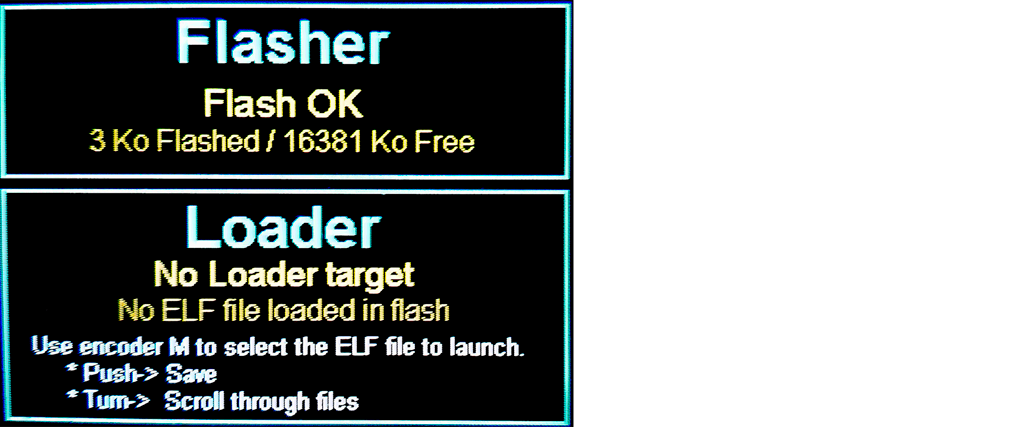
Top Section: Flasher
Displays the current flashing status and transfer progress.
Bottom Section: Loader
Displays:
- The executable files currently stored in QSPI flash memory
- The executable selected to start automatically at power-up
Detecting the OSCAR Pedal
In OSCAR_Flasher_Server:
- Click Refresh
- A new COM port should appear
- Select the new COM port
The information window should display:
OK : OSCAR is detected on COMxx
Adding Resource Files
OSCAR effects require at minimum all resource files located in:
...\OSCAR_Workspace\Software_OSCAR_P01A01\Ressources
Add Binary Resources
- Click Add File
- Open:
...\OSCAR_Workspace\Software_OSCAR_P01A01\Ressources\bin
- Select all files
- Click Open
The files will appear in the flashing list.
Add Image Resources
- Click Add File
- Open:
...\OSCAR_Workspace\Software_OSCAR_P01A01\Ressources\Images
- Select all files
- Click Open
The files will appear in the flashing list.
Adding Effect Executables
Before continuing, the effects must be compiled using the following build configurations:
_Delay4Loader_Reverb4Loader_Modulations4Loader
See tutorial: How to Compile Effects
Add the executable files:
Delay
....\OSCAR_Workspace\Software_OSCAR_P01A01\_Delay4Loader\Delay4L.elf
Reverb
....\OSCAR_Workspace\Software_OSCAR_P01A01\_Reverb4Loader\Reverb4L.elf
Modulations
....\OSCAR_Workspace\Software_OSCAR_P01A01\_Modulations4Loader\Modulations4L.elf
Flashing the Files
Click the Flash button to start the transfer.
On the OSCAR pedal:
- All existing files in QSPI flash memory are erased
- File transfer and storage begin
- Progress is synchronized with the Flasher Server
- Used and remaining flash memory sizes are displayed in real time
Once all files are written:
- The FlasherLoader verifies the data
- The screen displays:
Flash OK
OFSF Files
You can save an entire file list into a single .ofsf file by clicking Save Files. Later, you can simply add this OFSF file to the flashing list instead of manually selecting all files again.
Advantages:
- Faster workflow
- Fewer manipulation errors
- Easy project archiving
- Easy deployment of complete standalone configurations
Selecting the Executable to Launch
On the OSCAR pedal:
- Rotate encoder M to browse executable files stored in QSPI flash
- Press the encoder M to select the executable that will launch automatically at power-up
Launching an Effect
Power cycle the pedal or press the RESET button. The selected effect should start automatically.
Returning to FlasherLoader Mode
If you wish to:
- Change the executable to launch
- Transfer new files
You must hold Footswitch 1 during power-up. The executable launch is cancelled, and the FlasherLoader interface appears again.
🎉Congratulations
You have successfully programmed your OSCAR pedal with its effects.
🎸 Now it is time to make music :)
Naturally, you will probably want to:
- Modify existing effects
- Create completely new ones
The OSCAR ecosystem and the DAD_FORGE library were designed to simplify development by handling hardware complexity and providing many helpers:
- Graphics (GFX)
- GUI tools
- DSP helpers
- Resource management
- Hardware abstraction
🎶 This allows you to focus on what matters most:
Designing and creating the digital audio effects you have always dreamed of.